One of my yearly responsibilities is to help maintain and update the catalog at John’s Mustang. Like most companies, our product catalog is designed in Adobe InDesign. I have been an avid user and advocate of InDesign since it has come out, but it wasn’t until today that I took a serious looked into Scripting in the Adobe platform. My goal this afternoon has been to investigate how to simplify and automate some of the mundane and time consuming tasks that we (usually I), end up doing each and every year.
Like more programming experts (reads idiots who don’t read manuals and guides, and prefer to skips steps), I am looking to get started and get what I want done as quickly as possible.
A quick google search for InDesign scripting brings up three links that ended up helping me out.
Adobe InDesign CS3 Scripting Tutorial: A getting started guide by Adobe. All the examples in the guide are provided with full code.
Indesign Scripting Reference: While there is not a CS6 version listed, this is the only one I could obviously find, and the material on the site has proved reasonably useful. Still open to better and more organized suggestions though.
Adobe Forums: Forum: InDesign Scripting: User groups and forums are great places to find practical applications.
Step 1. Getting Started
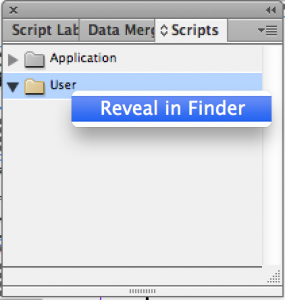
To begin, I opened up Adobe InDesign CS6 on my MacBook Pro and found the Scripting pane:
Windows > Utilities > Scripts
From here I was able to find the folder by right clicking on the User folder.
The full path is:
~/Library/Preferences/Adobe InDesign/Version 8.0/en_US/Scripts/Scripts Panel/
or more abstractly as:
/Users/<username>/Library/Preferences/Adobe InDesign/Version 8.0/<locale>/ScriptsÂ
All InDesign scripts must be placed in this folder.
InDesign CS6 on the Mac allows users to create scripts in either AppleScript or JavaScript. For cross platform compatibility, I chose JavaScript. JavaScript files must end in the suffix .js or .jsx.
Step 2. Creating a Script
Like every Unix/Linux programmer, I have a strong preference toward console based editors, in my case Emacs or Vim. However, I eventually settled on using ExtendScript Toolkit for this project because of its tight integration with the Adobe platform. The obvious benefits of using EST are:
- Syntax Highlighting (standard JS highlighting)
- Code Completion
- Integrated Debugger
To create a new JavaScript file, Â go to the ExtendScript Tolkit menu and choose:
File > New JavaScript
After creating a new file, I went ahead and saved it.
File > Save As
Yes, it is kind of weird to save a file before you have done anything, but I wasn’t quite sure how the script would magically appear in InDesign. Luckily, it was as easy as it seemed. If you save the script in the appropriate directory (as discussed in Step 1.) the script will automatically appear in the User scripts in the Scripting pane.
Step 3. Creating a simple script
As cliche as it may seem, the easiest and best script to start with is Hello World. So I went back into EST and put the following typical JavaScript code in:
alert('Hello World'); |
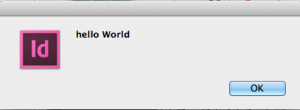
After saving, I went back into InDesign and executed my script from the Scripting pane. Sure enough, the alert box popped up!
I was able to add a debug breakpoint into my script (at the alert of course) and immediately saw the debugger in action. After a bunch of tinkering, I found myself attempting to start the execution of my script from within ExtendScript Toolkit. The question arose, How exactly does EST know which Adobe application to start? One post I found provided me the answer I was looking for, namely the #target directive. So, my complete, albeit simple script is now:
1 2 | #target indesign alert('hello World'); |
Step 4. Doing Something Useful
Up to this point, I’m sure everything discussed seems a bit remedial. While true, as a programmer of many languages and master of few, I find that understanding the software development environment and knowing how to do things can make all the difference.
Two years I dabbled a little in javascript for InDesign. At the time I coded everything in emacs, and without the integrated debugging facilities found in EST and reasonable API documentation, I found it very obscure trying to get anything to work right.
I have a couple target goals for learning scripting for InDesign. Most notably I would like to be able to hyperlink all 5 digit product codes in our catalog so that PDF versions of our catalog can take users directly to our website. My first step towards this goal is understanding the find/replace (and grep) model of InDesign CS6. For a simple starter script, I am looking to remove the trailing white space at the end of a text frame. After searching the web and the InDesign JavaScript guide, I can across a code sample that provided a good basis for what I needed. The only missing item was how do you reference the white space at the end of a text frame. I found one site that provided the regex
\s+\Z
where \s+ denotes 1 or more white space characters, and \Z denotes the end of the text frame. To be sure, I tested this regex using the Find/Replace GREP in InDesign. It worked like a charm! I had to stop and ask myself if it was this easy, was it really necessary to continue… And the answer was of course, Yes! I have a big fan of automation. There is simply too many small tasks to always remember to have to do. So as a software designer and engineer, simplicity is a good thing.
With the regex and script template in hand I was able to create a complete script that successfully removed all the white space at the end of all my text frames. The complete script is:
1 2 3 4 5 6 7 8 9 10 11 12 13 14 15 16 17 18 19 20 21 22 23 24 25 | /** * #1. remove trailing White space in Stories **/ app.findGrepPreferences = NothingEnum.nothing; app.changeGrepPreferences = NothingEnum.nothing; //Set the find options. app.findChangeGrepOptions.includeFootnotes = false; app.findChangeGrepOptions.includeHiddenLayers = false; app.findChangeGrepOptions.includeLockedLayersForFind = false; app.findChangeGrepOptions.includeLockedStoriesForFind = false; app.findChangeGrepOptions.includeMasterPages = false; //Regular expression for finding an email address. app.findGrepPreferences.findWhat = "\\s+\\Z"; app.changeGrepPreferences.changeTo = ""; var count = app.documents.item(0).findGrep().length; app.documents.item(0).changeGrep(); //Clear the find/change preferences after the search. app.findGrepPreferences = NothingEnum.nothing; app.changeGrepPreferences = NothingEnum.nothing; alert("Removing Trailing Whitespaces: " + count + "\n"); |
The final alert lets me know not only that the script was completed, but tells me exactly how many matches I got.
Step 5. Rinse and Repeat: A Second Script!
With this small but very useful script, I moved on to the next problem: How do I find product listings with too many columns (delineated by tabs). Unlink the previous script, there is no systematic algorithm for what should be done if the data is incorrectly formatted. For the time being, it is sufficient to know if the tabular data has an error or not. The complete code I have is as following:
1 2 3 4 5 6 7 8 9 10 11 12 13 14 15 16 17 18 19 20 21 22 23 24 | /** * #2. Search For columns with more than 5 columns **/ app.findGrepPreferences = NothingEnum.nothing; app.changeGrepPreferences = NothingEnum.nothing; //Set the find options. app.findChangeGrepOptions.includeFootnotes = false; app.findChangeGrepOptions.includeHiddenLayers = false; app.findChangeGrepOptions.includeLockedLayersForFind = false; app.findChangeGrepOptions.includeLockedStoriesForFind = false; app.findChangeGrepOptions.includeMasterPages = false; //Regular expression for finding an email address. app.findGrepPreferences.findWhat = "([^\\t\\r]+\\t){3}[^\\t\\r]+"; //app.changeGrepPreferences.changeTo = ""; var results = app.documents.item(0).findGrep(); var count = results.length; //Clear the find/change preferences after the search. app.findGrepPreferences = NothingEnum.nothing; app.changeGrepPreferences = NothingEnum.nothing; alert("Finished Searching for Lines w/excesive tabs: " + count + '\n'); |
as you can see the code is nearly identical as the previous. The two differences are:
- The regex used: “([^\\t\\r]+\\t){3}”
- findGrep() was used while changeGrep() was not
The regex I’m using searches for tabular data of the format:
[data]\t[data]\t[data]\t
where [data] is considered to be any set of characters that are not a tab or new line. The {3} is syntax to denote the expression to the left will be repeated three times. They key part of this regex is the final trailing tab ‘\t’. All three column tabular data of the following format is considered correctly formatted.
[data]\t[data]\t[data]
As a test, I changed the regex to:
"([^\\t\\r]+\\t){2}"
to verify that a two column version of this regex would match the three column tabular data in the document. The scripts performed as expected.
My foray into InDesign scripting today started off slow, but has been steadily progressing both in terms of my understanding of the language and framework, but also in terms of creating productive scripts. I’m not sure what took me so long to look into all this, but I am very impressed with what I am seeing and believe I have unlocked a set of tools that can greatly improve efficiency, decrease errors, and allows our business a quicker turn around time in producing our catalog.


0 Responses
Stay in touch with the conversation, subscribe to the RSS feed for comments on this post.