As discussed in my earlier post, I have been working on porting my simple RandomNumber Cocoa application to the iPhone. I encountered a mysterious EXC_BAD_ACCESS error because an object I instantiated in Interface Builder is being dealloc-ed immediately after it is created. I posted this discussion over at forums.macrumors.com, and was able to find an answer by PhoneyDeveloper that explained why I encountered the EXC_BAD_ACCESS error in the iPhone Application but not the Cocoa Application.
There are differences in how outlets are managed between MacOS X cocoa and iPhone OS UIKit. On UIKit you need to retain all top level objects from your nib. This is almost always done by having retaining properties for your IBOutlets.
And the final insight to my dilemma was:
If you are creating the Engine object in IB then that object must be an IBOutlet also. Typically that would be done in the view controller, which is the File’s Owner.
With that solved, Figure 1 shows the final product for RandomNumberIPhone.
Step 1: Creating the Project and Interface
Since this project is fairly similar to the RandomNumber Cocoa Application, I will cover only the different steps or new steps that I needed.
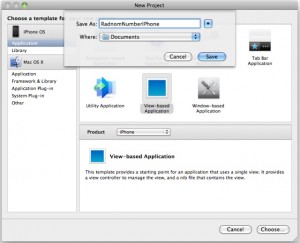
First, create a iPhone View application instead of a Cocoa application. Call the project RandomNumberIPhone (See Figure 2).
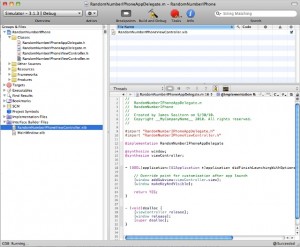
After the project is generated, you will see that in the Classes folder, that in addition to the Application delegate typically found in Cocoa applications, there are two files (.h, .m) for the view controller RandomNumberIPhoneViewController, and in the Interface Builder Files, that in addition to the MainWindow.xib there is an additional RandomNumberIPhoneViewController.xib. As mentioned at the beginning of this post, iPhone apps are handled slightly different than Cocoa applications. To port our Cocoa application to the iPhone we will need to use the View controller instead of the MainWindow.xib. Double click on the InterfaceBuilder file: RandomNumberIPhoneViewController.xib (see Figure 3) to create the View as well as the Engine class and class instance in Interface Builder.
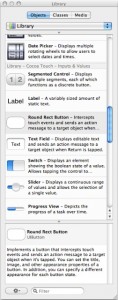
You will need to use UIButton (Figure 4) instead of NSButton and UILabel (Figure 5) instead of NSTextLabel.
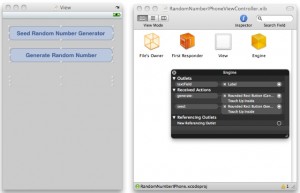
After designing the interface, and creating the Engine class, you will need to connect the outlets and actions. The Engine events will slightly be different. Instead of on Button push, they will need to be on push up inside. The design should look like Figure 6.
After finishing the outlets and actions, build the class files for Xcode and return to Xcode.
Step 2: Implementing the Functionality
In Engine.m, you will need to make a few adjustments to the methods we had in the Cocoa version. Since the UI used a UILabel instead of a a NSTextField, the code for the methods generate: and seed: will be as follows:
- (IBAction)generate:(id)sender { int rand; rand = (random() % 100) + 1; //Generate a number between 1-100 textField.text = [NSString stringWithFormat:@"%d", rand]; } - (IBAction)seed:(id)sender { srand(time(NULL)); //seed random generator textField.text = @"Random Number Generator Ready"; } |
Step 3: Connect the Missing Outlets
By this point, you have completed all the same basic steps from the RandomNumber Cocoa Application. The next step is to connect the missing dots so that the RandomNumberIPhone application will function properly. For the iPhone OSKit, you will need to ensure that the Engine class (or any other instantiated in Interface Builder) is an IBOutlet of the view, in this case RandomNumberIPhoneViewController. in RandomNumberIPhoneViewController.h, add the field and properties for Engine:
#import <UIKit/UIKit.h> #import "Engine.h" @interface RandomNumberIPhoneViewController : UIViewController { IBOutlet Engine *engine; } @property(nonatomic,retain) IBOutlet Engine * engine; @end |
and in RandomNumberIPhoneViewController.m
@synthesize engine; |
After you have completed this, return to Interface Builder and add the referring outlet for Engine to the view. Once you are done, the connections for Engine should look as follows (Figure 7).
After you save your Interface Builder files, return to Xcode and Build and Debug your program. It should be fully functional now. Enjoy!
Final Thoughts
My original intention for this project was to convert my code from a Cocoa application to an iPhone application. As hindsight is always 20/20, I believe if I was developing this project from scratch as an iPhone application (rather than porting my existing Cocoa application) it would have been better to either:
- Code the Engine class in the associated view controller. As the controller of the view, I think this would be a more sensible location following a typical MVC approach. Of course, there may be reasons why it is necessary to have a secondary Engine class to supplement the View Controller (MVC does not limit the number of view classes).
- Create the Engine class in Xcode first before designing the interface, instantiating the class Engine, and connecting the outlets and actions in Interface Builder. My motivation in this case is simply to decrease the amount of switching I need to do between Xcode and Interface Builder.


0 Responses
Stay in touch with the conversation, subscribe to the RSS feed for comments on this post.